
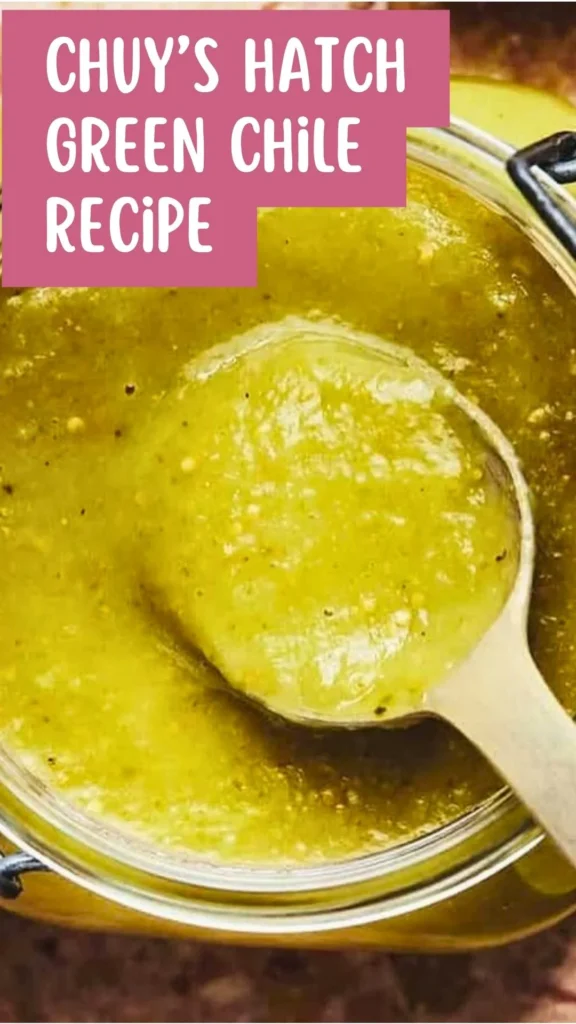
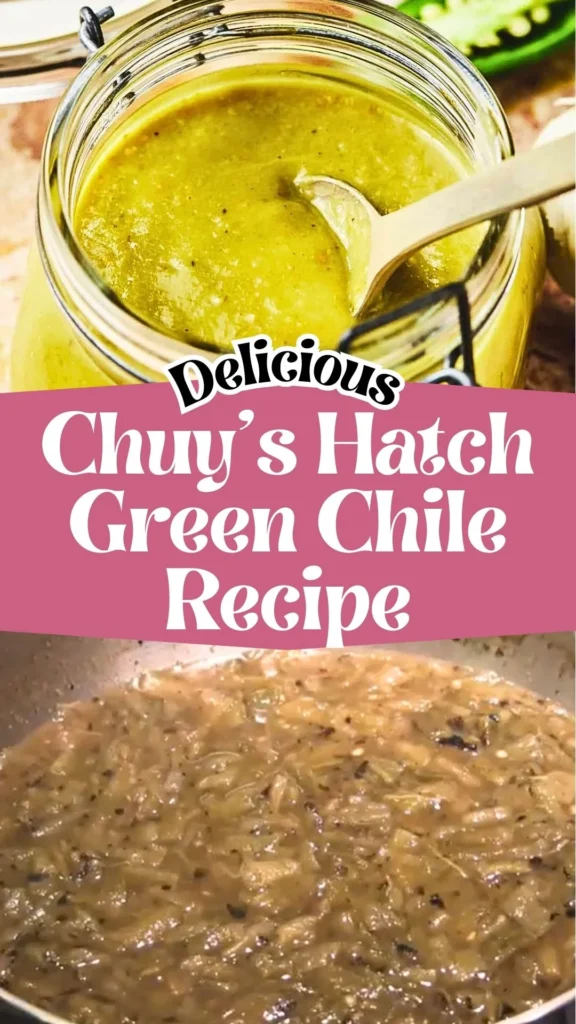
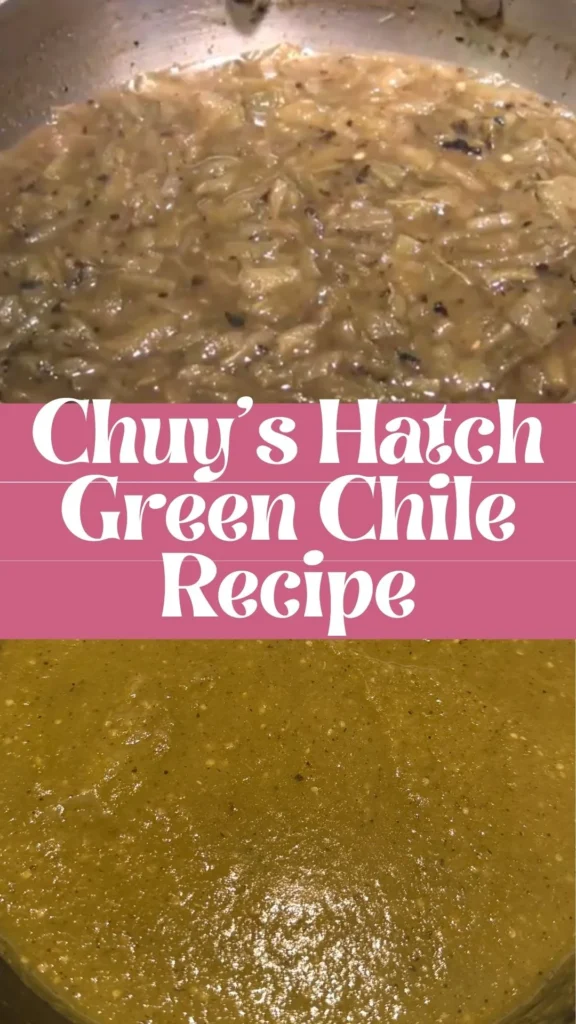
There’s something magical about Chuy’s famous hatch green chile sauce that keeps diners coming back for more. That silky, smoky, slightly spicy sauce draped over enchiladas, burritos, and grilled chicken is pure Tex-Mex comfort food perfection.
The good news? You don’t need to wait for your next restaurant visit to enjoy it. This copycat Chuy’s hatch green chile recipe brings that beloved flavor straight to your kitchen with simple ingredients and authentic technique.
Whether you’re a longtime fan or discovering this Southwestern classic for the first time, learning how to make Chuy’s hatch green chile will transform your home-cooked Mexican meals forever.
What Does It Taste Like?
This best green chile recipe delivers a complex flavor profile that balances earthy, smoky roasted hatch chiles with savory depth from caramelized onions and rich chicken broth.
The sauce has a mild to medium heat level that warms rather than overwhelms, allowing the authentic hatch chile flavor to shine through. You’ll taste subtle garlic notes, a silky smooth texture from the cornstarch slurry, and a gentle pepper finish.
The roasting process gives the green chilies a slightly charred, sweet undertone that distinguishes this from ordinary green chile sauces. It’s comforting, versatile, and unmistakably Tex-Mex in character.
Ingredients and Kitchen Utensils
Chuy’s Hatch Green Chile Recipe Ingredients:
- ½ medium onion, diced
- 1-2 tablespoons olive oil
- Salt (to taste, used in stages)
- 2 cups roasted, peeled, and diced Hatch green chilies
- 1 teaspoon garlic powder (or to taste)
- 2½ cups chicken broth
- 2-3 tablespoons cornstarch
- 3-4 tablespoons cold water
- ½ teaspoon white pepper (or black pepper as substitute)
Kitchen Utensils:
- Medium to large saucepan
- Wooden spoon or silicone spatula
- Small mixing bowl (for cornstarch slurry)
- Whisk or fork
- Measuring cups and spoons
- Knife and cutting board
Preparation and Cooking Time
Prep Time: 10 minutes (assuming chilies are already roasted and peeled)
Cook Time: 30-35 minutes
Total Time: 40-45 minutes
Servings: Makes approximately 3 cups of sauce (6-8 servings)
Chuy’s Hatch Green Chile Recipe Instructions
Step 1: Sauté the Aromatics
Add the diced onions to your saucepan with a pinch of salt and olive oil. Cook over low heat for about 5 minutes, stirring occasionally, until the onions become translucent and soft.
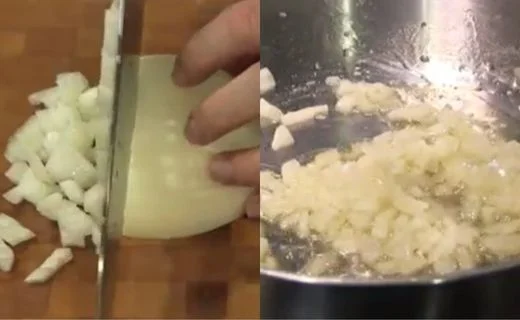
This gentle cooking develops sweetness without browning.
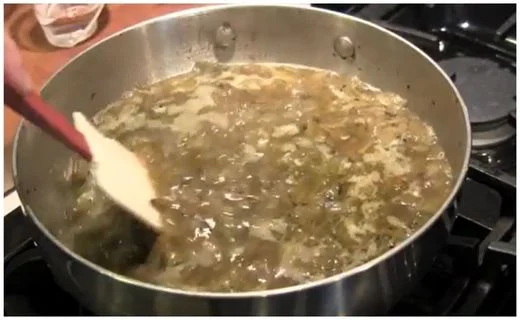
Step 2: Cook the Hatch Green Chilies
Add your prepared roasted, peeled hatch green chilies to the softened onions. Sprinkle in additional salt and garlic powder to taste.
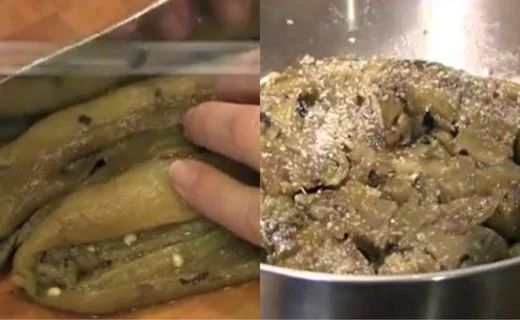
Cook over medium-low heat for approximately 10 minutes, stirring occasionally. This crucial step reduces moisture content in the chilies, concentrating their flavor and preventing a watery sauce.
Step 3: Add the Broth Base
Pour in the chicken broth and bring the mixture to a gentle simmer. Reduce heat to low and let it simmer for about 10 minutes, stirring occasionally.
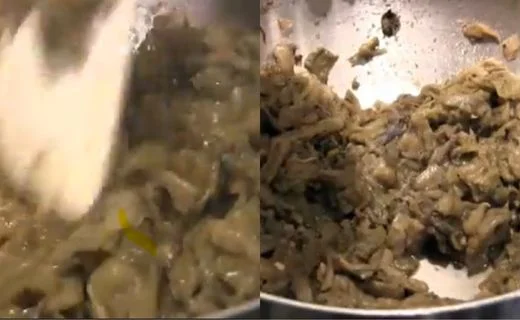
This allows the flavors to meld beautifully.
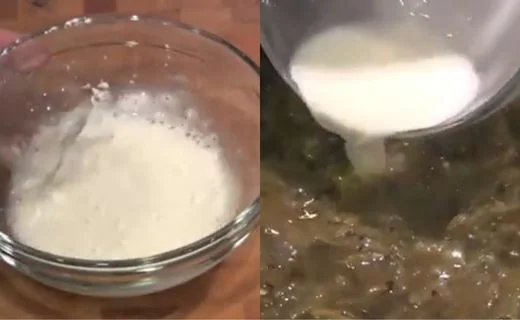
Step 4: Prepare the Cornstarch Slurry
In a small separate bowl, combine cornstarch with cold water. Whisk thoroughly until completely smooth with no lumps remaining.
This slurry method prevents clumping that occurs when adding dry cornstarch directly to hot liquid.
Step 5: Thicken the Sauce
Gradually add the cornstarch slurry to the simmering chile mixture, about a tablespoon at a time, stirring constantly. Wait 2-3 minutes between additions to allow the cornstarch to fully activate and thicken. Stop adding slurry just before reaching your desired consistency, as it will continue to thicken.
Step 6: Final Simmer
Continue simmering the sauce over low heat for another 5-10 minutes. This final cook time eliminates any raw cornstarch taste and achieves that perfect thick-but-pourable restaurant-style consistency.
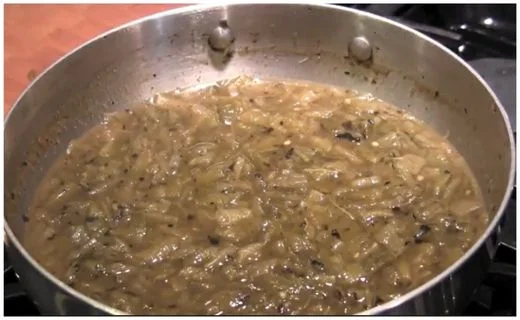
Step 7: Season and Serve
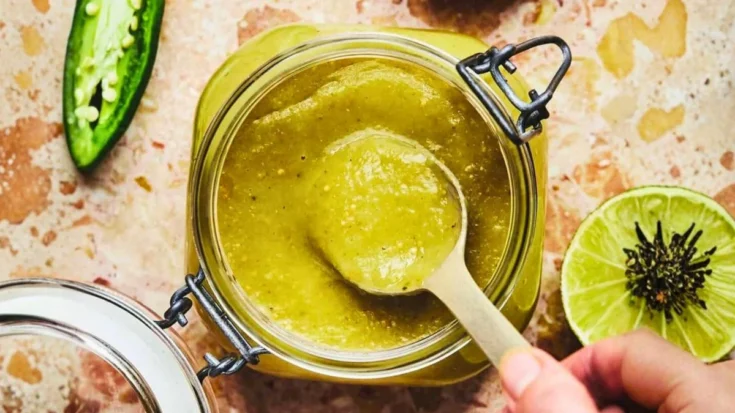
Turn off the heat. Taste the sauce and adjust seasoning with additional salt and white pepper as needed. Let the salt dissolve for a few minutes before tasting again. Your copycat Chuy’s hatch green chile sauce is now ready to elevate any dish.
Customization and Pairing for Serving Ideas
1. Smothered Enchiladas Supreme
Drench cheese, chicken, or beef enchiladas with this hatch green chile recipe for an authentic Tex-Mex experience. Roll your favorite fillings in corn tortillas, arrange in a baking dish, cover generously with the sauce, top with shredded Monterey Jack cheese, and bake at 350°F until bubbly. The sauce’s silky texture complements the melted cheese perfectly.
2. Green Chile Breakfast Bowl
Transform your morning with scrambled eggs, crispy breakfast potatoes, black beans, avocado slices, and a generous ladle of warm green chile sauce. Add crumbled cotija cheese and fresh cilantro for a restaurant-quality breakfast that rivals any brunch spot.
3. Coastal Taco Fusion
Elevate Chuy’s Hatch Green Chile Recipe by drizzling it over crispy chuy’s baja fish taco for smoky heat, while pairing with fresh slaw and lime crema to balance bold Southwestern flavors beautifully.
4. Spicy Variation
For heat lovers, blend in 1-2 diced jalapeños or serrano peppers when cooking the onions, or stir in a teaspoon of cayenne pepper during the final seasoning. You can also use extra-hot hatch chile varieties when they’re in season for an authentic New Mexico kick.
5. Creamy Green Chile Sauce
Stir in ½ cup of heavy cream or Mexican crema during the final simmer for a richer, milder version. This creamy adaptation works beautifully over pork chops, grilled fish, or as a pasta sauce base. The dairy mellows the heat while adding luxurious body.
6. Shrimp Fiesta Upgrade
Enhance Chuy’s Hatch Green Chile Recipe as a zesty topping for chuy’s baja shrimp tacos, adding roasted corn salsa and avocado slices to create a vibrant, restaurant-style Tex-Mex dinner experience
7. Vegetarian/Vegan Adaptation
Simply substitute vegetable broth for chicken broth to make this recipe plant-based friendly. The sauce maintains its depth of flavor and works wonderfully over roasted vegetables, vegan enchiladas, or grain bowls. Consider adding a splash of lime juice for extra brightness.
8. Comfort Burrito Twist
Serve Chuy’s Hatch Green Chile Recipe generously over chuy’s bean and cheese burrito, then add cilantro rice and pico de gallo for a hearty, flavor-packed Mexican-inspired family meal option.
9. Protein Pairings
This best green chile recipe is incredibly versatile with proteins. Spoon it over grilled chicken breasts, seared pork tenderloin, pan-fried tilapia, or slow-cooked carnitas. It also makes an excellent topping for carne asada tacos or as a finishing sauce for fajitas straight from the skillet.
10. Rice and Bean Enhancement
Elevate simple sides by mixing this sauce into cilantro-lime rice, spooning it over pinto or black beans, or using it as a flavorful base for Mexican rice. The sauce adds complexity and moisture to grain and legume dishes that might otherwise be ordinary.
Tips for Perfect Chuy’s Hatch Green Chile
1. Source Quality Hatch Chiles
Authentic Hatch green chiles from New Mexico’s Hatch Valley offer superior flavor compared to generic green chiles. During peak season (late summer), buy fresh hatch chiles and roast them yourself, or purchase frozen roasted hatch chiles year-round from specialty grocers. The terroir of Hatch chiles-their unique growing conditions-creates that distinctive earthy, slightly sweet flavor profile that defines this recipe.
2. Master the Roasting Process
If roasting fresh hatch chiles at home, char them over an open flame, under a broiler, or on a hot grill until the skin blisters and blackens all over. Immediately transfer to a covered bowl or paper bag for 10-15 minutes to steam, which loosens the skins. Peel away the charred skin, remove stems and seeds, then dice. This roasting step is non-negotiable for authentic flavor-it develops the smoky complexity that canned green chiles simply cannot match.
3. Control Your Thickness Carefully
The cornstarch slurry technique requires patience and restraint. Remember that cornstarch continues thickening as it cools, so your sauce should look slightly thinner than desired while hot. If you accidentally over-thicken, simply whisk in additional chicken broth a tablespoon at a time until you reach the perfect pourable consistency. Conversely, if it’s too thin, prepare a small additional slurry and add gradually.
4. Use White Pepper Strategically
White pepper isn’t just a substitution-it’s a traditional choice in Mexican cuisine for sauces where black specks would be visually unappealing. White pepper also offers a different flavor profile, with more fermented, earthy notes that complement the green chiles beautifully. If you only have black pepper, it works fine, but white pepper elevates authenticity and presentation.
5. Caramelize Onions Properly
Don’t rush the initial onion cooking step. Those five minutes of gentle cooking over low heat allow the onions to release their sugars and become sweet and tender without browning. This creates a flavor foundation that balances the chile heat. Browning the onions would introduce bitter notes that conflict with the sauce’s intended profile.
6. Batch Cooking and Freezing Strategy
This recipe for Chuy’s hatch green chile freezes exceptionally well, making it perfect for meal prep. Double or triple the batch, then portion into freezer-safe containers in 1-cup or 2-cup quantities. Freeze flat in zip-top bags for space-efficient storage. Frozen sauce keeps for 3-4 months and thaws quickly in the microwave or on the stovetop. Having homemade green chile sauce ready to go makes weeknight cooking infinitely easier.
7. Adjust Heat Levels to Your Preference
Hatch chiles range from mild to extra-hot depending on variety. If you’re unsure about heat tolerance, start with mild hatch chiles and taste the sauce before serving. You can always add heat with hot sauce, cayenne, or diced fresh chiles, but you can’t remove it once added. For families with varying spice preferences, make the base recipe mild and offer hot sauce on the side.
Storage and Reheating Guidance
Store leftover hatch green chile sauce in an airtight container in the refrigerator for up to 5 days. Reheat gently on the stovetop over low heat, stirring frequently and adding a splash of chicken broth if the sauce has thickened too much. For frozen sauce, thaw overnight in the refrigerator or use the defrost setting on your microwave before reheating.
Common Queries and FAQs
Find clear answers to the top questions about Chuy’s Hatch Green Chile Recipe.
Can I use canned green chiles instead of fresh Hatch chiles?
Yes, you can substitute canned diced green chiles in a pinch, though the flavor won’t be quite as complex or smoky. Use about 2 cups of drained canned chiles (typically two 7-ounce cans). The sauce will still taste good but will lack that distinctive roasted hatch chile depth. If using canned, consider adding a pinch of smoked paprika to approximate the roasted flavor.
What’s the difference between Hatch chiles and regular green chiles?
Hatch chiles are a specific type of New Mexico chile pepper grown in the Hatch Valley region. They have a unique flavor profile-earthy, slightly sweet, with a distinctive terroir similar to how champagne comes from Champagne, France. Regular green chiles (like Anaheim or poblano peppers) can be used as substitutes, but they’ll produce a different, though still delicious, flavor.
How spicy is this copycat Chuy’s hatch green chile recipe?
The heat level varies depending on which variety of hatch chiles you use. Mild hatch chiles create a sauce with gentle warmth suitable for most palates, while medium or hot varieties deliver more pronounced spice. On average, expect a mild to medium heat-warming but not overwhelming. The sauce focuses more on flavor complexity than pure heat.
Can I make this recipe without cornstarch?
Yes, you have alternatives. Substitute flour for cornstarch by making a roux: cook 2 tablespoons of butter with 2 tablespoons of flour for 2-3 minutes, then gradually whisk in the chile mixture. Alternatively, blend a portion of the cooked chile mixture until smooth and stir it back in to naturally thicken the sauce. The cornstarch method produces the clearest, most restaurant-like appearance, while flour creates a slightly more opaque sauce.
Why use white pepper instead of black pepper?
White pepper serves both aesthetic and culinary purposes in this best green chile recipe. Visually, it avoids black specks in the green sauce, maintaining that clean restaurant appearance. Flavor-wise, white pepper has a more fermented, earthy taste that complements the green chiles differently than black pepper’s sharper bite. However, black pepper works perfectly fine if that’s what you have available.
How do I roast and peel fresh Hatch chiles?
Place fresh hatch chiles directly over a gas flame, under a broiler set to high, or on a hot grill. Rotate frequently until the skin is completely blackened and blistered on all sides (5-7 minutes). Immediately transfer to a bowl and cover tightly with plastic wrap, or place in a paper bag and seal. Let steam for 10-15 minutes-this loosens the skin. Once cool enough to handle, peel away the charred skin (it should slip off easily), remove the stem and seeds, then dice the flesh.
Can I make this sauce spicier after it’s cooked?
Absolutely. Stir in your favorite hot sauce, add cayenne pepper or red pepper flakes, or blend in some fresh jalapeños or serranos. You can also reserve some of the hatch chile seeds (which contain most of the heat) and add them back gradually until you reach your desired spice level. Adding heat after cooking gives you more control and allows you to customize individual portions.
What dishes work best with this hatch green chile sauce?
This versatile sauce enhances countless dishes: smothered burritos, enchiladas, tamales, huevos rancheros, chilaquiles, grilled chicken or pork, fish tacos, nachos, quesadillas, breakfast burritos, rice bowls, and even as a base for green chile stew. It’s also excellent over eggs, mixed into mashed potatoes, or used as a dipping sauce for chips and vegetables.
How far in advance can I make this sauce?
You can prepare this recipe for Chuy’s hatch green chile up to 5 days ahead and store it refrigerated in an airtight container. The flavors actually deepen and meld beautifully after a day or two, making it perfect for meal prep. For longer storage, freeze the sauce for 3-4 months. Always reheat gently to maintain the smooth consistency.
My sauce turned out too thick/thin. How do I fix it?
If too thick, simply whisk in additional chicken broth a tablespoon at a time while reheating gently until you reach the desired pourable consistency. If too thin, create a small new cornstarch slurry (1 tablespoon cornstarch mixed with 2 tablespoons cold water) and add it gradually while simmering, allowing time between additions for the thickening to activate. Remember that the sauce thickens as it cools.
Is this sauce gluten-free?
Yes, when made with cornstarch (not flour) and gluten-free chicken broth, this hatch green chile recipe is naturally gluten-free. Always check your chicken broth label to ensure it doesn’t contain gluten-containing additives. This makes it a great option for guests with celiac disease or gluten sensitivities.
Can I use this as a salsa or dip?
While this sauce has a thicker, more gravy-like consistency than traditional salsa, it works wonderfully as a warm dipping sauce for tortilla chips, especially when served in a small bowl alongside your appetizer spread. For a thinner, more salsa-like consistency, use less cornstarch or thin it with additional broth. You can also pulse it briefly in a blender for a smoother texture.
Chuy's Hatch Green Chile Recipe
There’s something magical about Chuy’s famous hatch green chile sauce that keeps diners coming back for more. That silky, smoky, slightly spicy sauce draped over enchiladas, burritos, and grilled chicken is pure Tex-Mex comfort food perfection. The good news? You don’t need to wait for your next restaurant visit to enjoy it. This copycat Chuy’s hatch green chile recipe brings that beloved flavor straight to your kitchen with simple ingredients and authentic technique.
Ingredients
- ½ medium onion, diced
- 1-2 tablespoons olive oil
- Salt (to taste, used in stages)
- 2 cups roasted, peeled, and diced Hatch green chilies
- 1 teaspoon garlic powder (or to taste)
- 2½ cups chicken broth
- 2-3 tablespoons cornstarch
- 3-4 tablespoons cold water
- ½ teaspoon white pepper (or black pepper as substitute)
Instructions
Step 1: Sauté the Aromatics
Add the diced onions to your saucepan with a pinch of salt and olive oil. Cook over low heat for about 5 minutes, stirring occasionally, until the onions become translucent and soft. This gentle cooking develops sweetness without browning.
Step 2: Cook the Hatch Green Chilies
Add your prepared roasted, peeled hatch green chilies to the softened onions. Sprinkle in additional salt and garlic powder to taste. Cook over medium-low heat for approximately 10 minutes, stirring occasionally. This crucial step reduces moisture content in the chilies, concentrating their flavor and preventing a watery sauce.
Step 3: Add the Broth Base
Pour in the chicken broth and bring the mixture to a gentle simmer. Reduce heat to low and let it simmer for about 10 minutes, stirring occasionally. This allows the flavors to meld beautifully.
Step 4: Prepare the Cornstarch Slurry
In a small separate bowl, combine cornstarch with cold water. Whisk thoroughly until completely smooth with no lumps remaining. This slurry method prevents clumping that occurs when adding dry cornstarch directly to hot liquid.
Step 5: Thicken the Sauce
Gradually add the cornstarch slurry to the simmering chile mixture, about a tablespoon at a time, stirring constantly. Wait 2-3 minutes between additions to allow the cornstarch to fully activate and thicken. Stop adding slurry just before reaching your desired consistency, as it will continue to thicken.
Step 6: Final Simmer
Continue simmering the sauce over low heat for another 5-10 minutes. This final cook time eliminates any raw cornstarch taste and achieves that perfect thick-but-pourable restaurant-style consistency.
Step 7: Season and Serve
Turn off the heat. Taste the sauce and adjust seasoning with additional salt and white pepper as needed. Let the salt dissolve for a few minutes before tasting again. Your copycat Chuy’s hatch green chile sauce is now ready to elevate any dish.
Notes
Store leftover hatch green chile sauce in an airtight container in the refrigerator for up to 5 days. Reheat gently on the stovetop over low heat, stirring frequently and adding a splash of chicken broth if the sauce has thickened too much. For frozen sauce, thaw overnight in the refrigerator or use the defrost setting on your microwave before reheating.
Nutrition Information:
Yield:
10Serving Size:
1Amount Per Serving: Calories: 50
Now you know how to make Chuy’s hatch green chile sauce that rivals your favorite Tex-Mex restaurant. This copycat recipe delivers that signature silky texture, smoky depth, and perfectly balanced heat that makes it so crave-worthy. With simple ingredients and straightforward technique, you can create batches of this versatile sauce to enhance everything from weeknight enchiladas to weekend brunch.
Make it your own with the customization ideas, and don’t forget to freeze extra portions for those busy nights when you need restaurant-quality flavor fast. Your homemade Tex-Mex just got a serious upgrade!
You can also follow us on Pinterest, and YouTube for more delicious updates and kitchen inspiration. Your feedback and support mean the world to us!