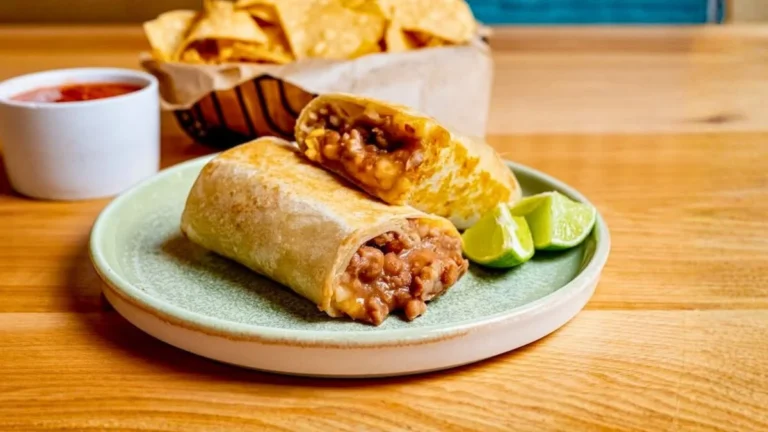
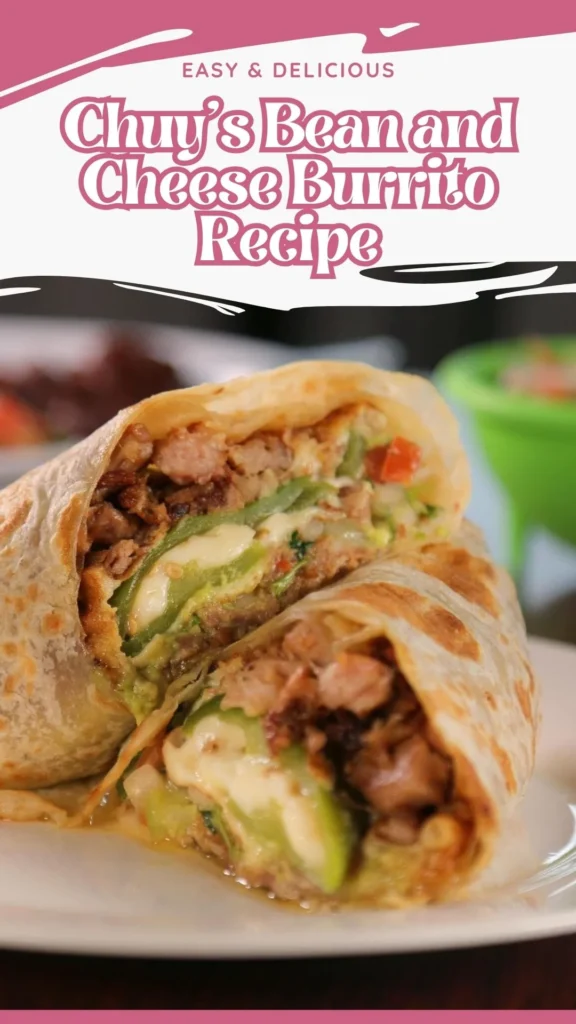
If you’ve ever craved that iconic Chuy’s bean and cheese burrito with its perfectly seasoned rice, creamy refried beans, and smoky roasted poblano peppers, you’re in for a treat.
This copycat Chuy’s bean and cheese burrito recipe brings the beloved Tex-Mex restaurant experience straight to your kitchen. What makes this recipe for Chuy’s bean and cheese burrito truly special is the layered approach homemade Mexican rice, bacon-infused refried beans, fire-roasted poblanos, and that secret crunch from tortilla chips hidden inside.
This delicious Chuy’s bean and cheese burrito delivers authentic flavors and textures that rival the original, making it the best bean and cheese burrito recipe for your weeknight dinners or weekend gatherings.
What Does It Taste Like?
This classic bean and cheese burrito offers a harmonious blend of Tex-Mex flavors in every bite. The creamy, smoky refried beans meld beautifully with fluffy, tomato-infused Mexican rice seasoned with cumin and chili powder.
Roasted poblano peppers add a subtle heat and earthy sweetness, while melted cheese creates rich, gooey pockets throughout. The surprise crunch from embedded tortilla chips provides textural contrast against the soft tortilla exterior, which gets gloriously crispy when grilled.
Each component balances the others the beans bring creaminess, the rice adds substance, the peppers contribute depth, and the cheese ties everything together with savory, melty goodness that makes this bean burrito recipe absolutely irresistible.
Chuy’s Bean and Cheese Burrito Recipe Ingredients and Kitchen Utensils
For the Mexican Rice (yields enough for 4-6 burritos):
- 1 medium onion, finely diced
- 1 tablespoon neutral oil (vegetable or canola)
- 1 tablespoon butter
- 1 cup long-grain white rice
- 1 teaspoon dried oregano
- 1 teaspoon ground cumin
- ½ teaspoon onion powder
- ½ teaspoon garlic powder
- 1 teaspoon chili powder
- 1¾ cups chicken broth (preferred) or water
- ⅔ cup tomato sauce
The Roasted Poblano Peppers:
- 2 large poblano peppers (or pasilla peppers)
- 1 teaspoon oil for rubbing
And The Refried Beans:
- 1 (15-ounce) can pinto beans with liquid
- 3-4 strips bacon
- ½ teaspoon garlic powder
- ½ teaspoon ground cumin
- Salt and black pepper to taste
Assembling Each Burrito:
- 1 large flour tortilla (burrito-size, 10-12 inches)
- ½ cup refried beans (divided)
- ½ cup Mexican rice
- 2-3 strips roasted poblano pepper
- ½ cup shredded cheese (cheddar, Monterey Jack, or Mexican blend)
- 4-5 tortilla chips
Essential Kitchen Utensils:
- Medium saucepan with lid
- Large skillet or frying pan
- Grill, broiler, or gas stovetop
- Potato masher
- Paper bag or sealed container
- Griddle or flat-top pan
- Sharp knife and cutting board
- Measuring cups and spoons
Preparation and Cooking Time
Prep Time: 20 minutes
Cook Time: 35 minutes
Total Time: 55 minutes
Servings: 4-6 burritos
Difficulty Level: Intermediate
Chuy’s Bean and Cheese Burrito Recipe Instructions
Step 1: Prepare the Mexican Rice
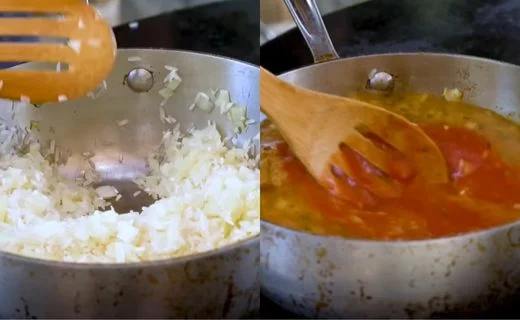
Finely dice the onion using horizontal cuts, vertical cuts, then chopping across. Heat the oil and butter in a medium saucepan over medium heat. Add the diced onion and sauté for about 5 minutes until softened and translucent. Stir in the rice, coating each grain with the fat, and toast lightly for 1-2 minutes until fragrant.
Step 2: Season and Cook the Rice
Add oregano, cumin, onion powder, garlic powder, and chili powder to the rice mixture, stirring to distribute evenly. Pour in the chicken broth and tomato sauce, stirring well to combine. Bring the mixture to a rolling boil, then immediately cover with a tight-fitting lid. Reduce heat to low and simmer for 15 minutes without lifting the lid.
Step 3: Finish the Rice
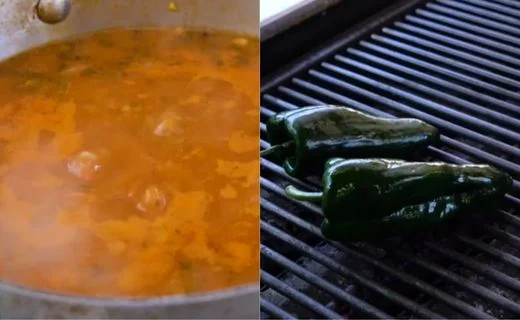
After 15 minutes, remove from heat and let stand covered for 5 minutes. Fluff the rice with a fork and check the bottom of the pan to ensure nothing is sticking or burning. Set aside while you prepare the other components.
Step 4: Roast the Poblano Peppers
Rub the poblano peppers lightly with oil to coat the skin. Place them directly on a hot grill, under a broiler set to high, or over a gas stovetop flame. Char the peppers, turning occasionally with tongs, until the skin is blackened and blistered evenly on all sides and the peppers appear puffy this takes about 8-10 minutes.
Step 5: Steam and Peel the Peppers
Immediately transfer the charred peppers to a paper bag or sealed container. Close tightly and let them steam for 10 minutes this loosens the skin. Remove the peppers and peel off the charred skin under cool running water (some black bits remaining are fine and add flavor). Remove the stems and seeds, then slice the peppers into ¼-inch strips. Set aside.
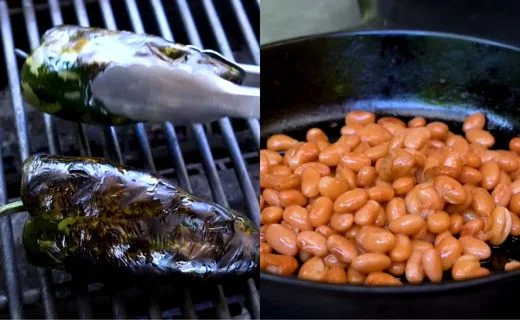
Step 6: Make the Refried Beans
Cook the bacon strips in a large skillet over medium heat until crispy and the fat is rendered, about 6-8 minutes. Remove the bacon pieces (save for snacking or discard). Drain the pinto beans, reserving the liquid in a separate container. Add the drained beans to the bacon grease in the pan.
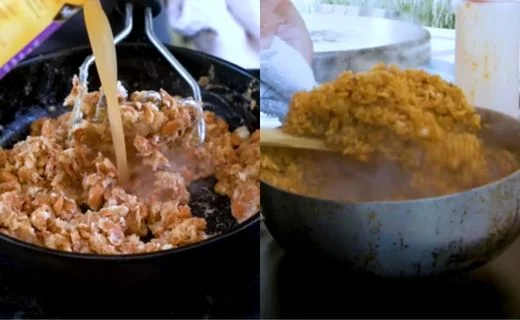
Step 7: Season and Mash the Beans
Heat the beans through for 2-3 minutes, then season with garlic powder, cumin, salt, and black pepper. Using a potato masher, mash the beans to your desired consistency leave some chunks for authentic texture rather than making them completely smooth. Add reserved bean liquid, a tablespoon at a time, if the beans become too thick or dry. Keep warm over low heat.
Step 8: Warm and Prepare the Tortilla
Heat a griddle or flat-top pan over medium-high heat. Place the flour tortilla on the hot surface for about 10 seconds per side, just until warm and pliable but not crispy. Remove to a clean work surface.
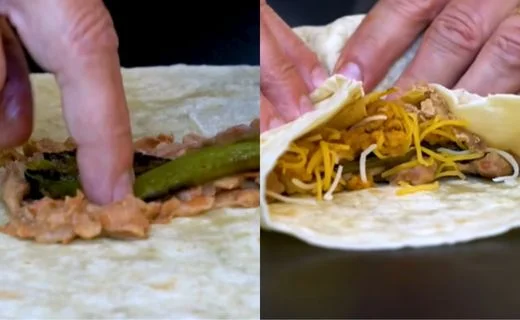
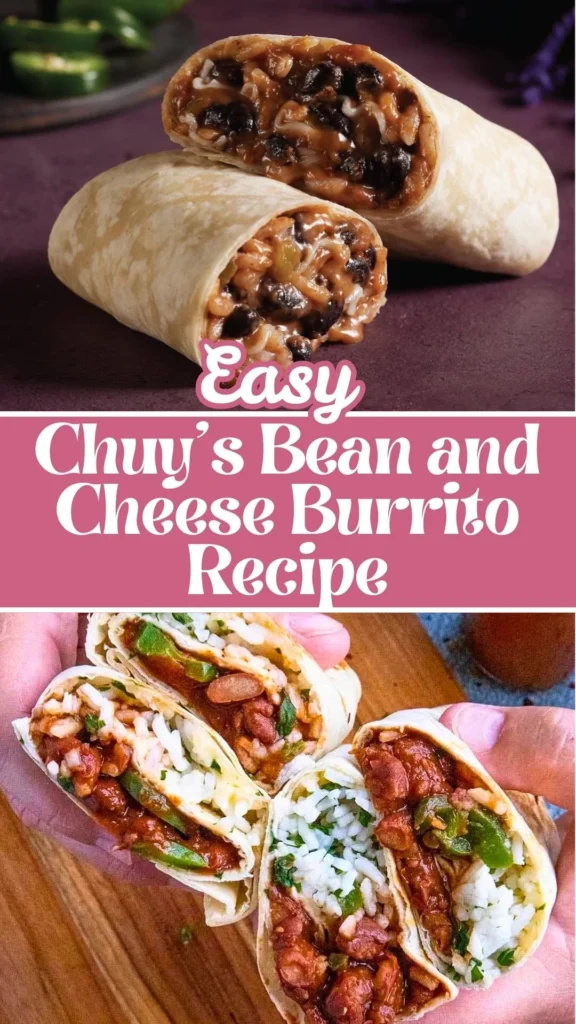
Step 9: Layer the Burrito Filling
Spread about ¼ cup of refried beans in a horizontal line across the center of the tortilla, leaving 2 inches from the edges this acts as “glue” to hold everything together. Arrange 2-3 strips of roasted poblano pepper over the beans. Add ½ cup of Mexican rice on top of the peppers. Sprinkle the shredded cheese evenly over the rice. Add another thin layer of refried beans (about 2-3 tablespoons) over the cheese. Place 4-5 tortilla chips in a line down the center for that signature crunch.
Step 10: Roll the Burrito
Fold the left and right sides of the tortilla inward over the filling. Starting from the edge closest to you, tightly roll the burrito away from yourself, keeping the sides tucked in and the filling compact. Roll until completely sealed.
Step 11: Grill to Perfection
Place the rolled burrito seam-side down on the hot griddle. Cook for 2-3 minutes until the bottom is golden brown and crispy. Carefully flip and cook the other side for another 2-3 minutes. Rotate to crisp the edges as well. The tortilla should be toasted and golden with visible grill marks.
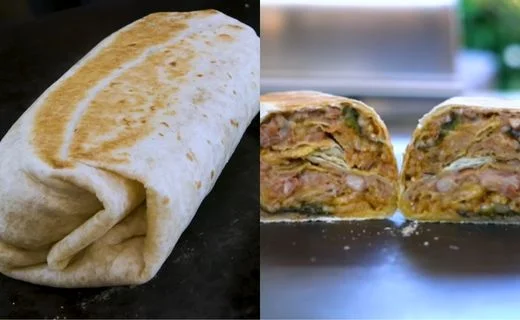
Step 12: Serve
Remove the grilled cheese burrito from the heat. Optionally, cut it in half diagonally to showcase the beautiful layers inside. Serve immediately while hot to enjoy the contrast of crispy exterior, melted cheese, fluffy rice, and creamy beans.
Customization and Pairing Ideas for Serving
1. Protein Power-Ups
Transform this bean and cheese burrito recipe easy into a heartier beef bean and cheese burrito recipe by adding seasoned ground beef or shredded beef barbacoa. Brown 1 pound of ground beef with cumin, chili powder, and garlic, then layer it with the beans and rice. Alternatively, try shredded chicken tinga, carnitas, or chorizo for authentic Tex-Mex variations.
2. Vegetarian Enhancements
Keep this vegetarian masterpiece exciting by adding sautéed bell peppers and onions (fajita-style), grilled corn kernels, or black beans mixed with the pintos. Fresh spinach or roasted sweet potatoes add nutrients and color while maintaining the meat-free profile that makes this bean and cheese burrito so accessible.
3. Sauce and Salsa Pairings
Serve your burrito with complementary sauces: creamy jalapeño ranch, smoky chipotle crema, tangy tomatillo salsa verde, or classic pico de gallo. For authentic Chuy’s experience, offer their famous creamy jalapeño dip on the side. A dollop of sour cream and fresh guacamole elevates every bite.
4. Cheese Variety Exploration
While cheddar and Monterey Jack are traditional, experiment with queso Oaxaca for authentic Mexican stringiness, pepper jack for extra heat, or a four-cheese Mexican blend for complexity. Try cotija cheese crumbled on top for a salty, tangy finish that mimics street taco authenticity.
5. Tangy Sauce Elevation
Transform your burrito experience by drizzling homemade Chuy’s green sauce over the top. This zesty condiment adds vibrant flavor and authentic restaurant-quality taste that perfectly complements melted cheese and seasoned beans for an unforgettable meal.
6. Side Dish Companions
Pair your classic bean and cheese burritos with Mexican street corn (elote), crispy tortilla chips with queso dip, black bean soup, or a fresh cilantro-lime coleslaw. Seasoned sweet potato fries or crispy taquitos make excellent accompaniments for a complete Tex-Mex feast.
7. Protein-Packed Alternative
Craving something heartier? Upgrade to our savory Chuy’s beef burrito for a satisfying twist. This meaty variation delivers bold flavors while maintaining the same beloved Tex-Mex essence, ideal for those seeking a more substantial dining experience.
8. Breakfast Burrito Adaptation
Convert this recipe into a breakfast powerhouse by adding scrambled eggs, breakfast potatoes, and crumbled breakfast sausage alongside the beans and cheese. The poblano peppers and Mexican rice still work beautifully in morning versions, especially when topped with ranchero sauce.
9. Bowl-Style Presentation
For a low-carb option or when serving a crowd, deconstruct this delicious Chuy’s bean and cheese burrito into a burrito bowl. Layer rice, beans, peppers, cheese, and chips in a bowl, then top with lettuce, tomatoes, sour cream, and salsa. This presentation works wonderfully for meal prep and allows guests to customize their portions.
Essential Tips for Perfect Results
1. Rice Texture Mastery
The key to restaurant-quality Mexican rice is toasting the grains in fat before adding liquid this creates separate, fluffy grains rather than mushy rice. Don’t skip this step, and resist the urge to stir during cooking, which releases starch and creates gummy texture. If your rice turns out wet, remove the lid and cook on low for 2-3 additional minutes to evaporate excess moisture.
2. Poblano Pepper Selection and Roasting
Choose poblanos that are firm, glossy, and dark green without soft spots. The charring process is crucial you want the skin completely blackened and blistered for easy peeling and maximum smoky flavor. If you don’t have a grill, your oven broiler works perfectly; just place peppers on the top rack and watch carefully, turning every 2-3 minutes. The steaming step is non-negotiable for easy peeling.
3. Bacon Grease Balancing Act
Don’t drain all the bacon grease before adding beans you want about 2 tablespoons remaining for optimal flavor without greasiness. If your bacon renders too much fat, pour off the excess before adding beans. Conversely, if you’re using lean bacon, add a teaspoon of butter to ensure enough fat to flavor the beans and prevent sticking during mashing.
4. Bean Consistency Control
The perfect refried bean texture should be creamy but spreadable, not soupy or paste-like. Add reserved bean liquid gradually you can always add more but can’t take it away. If beans become too thin, simply cook uncovered for a few minutes to evaporate excess liquid. For authentic texture, leave about 20% of the beans chunky rather than completely mashed.
5. Tortilla Temperature Technique
Cold tortillas crack when rolled; overheated tortillas become brittle. The sweet spot is warming them just until pliable about 10 seconds per side on a dry griddle. If making multiple burritos, stack warmed tortillas in a clean kitchen towel to keep them soft. Alternatively, wrap tortillas in damp paper towels and microwave for 15-20 seconds.
6. Assembly Order Matters
Always start with beans directly on the tortilla they act as moisture barrier and adhesive. Place wetter ingredients (beans, rice) in the center and drier ingredients (cheese, chips) on top to prevent soggy tortillas. Don’t overfill; about ¾ cup total filling per burrito is ideal. Overstuffing makes rolling difficult and causes bursting during grilling.
7. Grilling for Golden Perfection
The final grilling step transforms a good burrito into a great one. Medium-high heat is essential too low and you’ll dry out the filling before crisping the outside; too high and you’ll burn the tortilla before the cheese melts. A light spray of cooking oil on the griddle helps achieve even browning. Press down gently with a spatula while grilling to create maximum surface contact and those coveted crispy spots.
Storage and Reheating Guidance
Store assembled but ungrilled burritos wrapped individually in aluminum foil in the refrigerator for up to 3 days, or freeze for up to 2 months. Reheat refrigerated burritos on a griddle over medium heat for 3-4 minutes per side until heated through. For frozen burritos, thaw overnight in the refrigerator before reheating, or microwave for 2-3 minutes, then crisp on a hot griddle.
Common Queries and FAQs
Discover answers to the most common Chuy’s Bean and Cheese Burrito Recipe questions people ask.
Can I make this Chuy’s bean and cheese burrito recipe ahead of time?
Absolutely! Prepare the Mexican rice, refried beans, and roasted poblano peppers up to 3 days in advance and store them separately in airtight containers in the refrigerator. When ready to assemble, simply reheat each component gently before building your burritos. This makes weeknight dinners incredibly quick and stress-free.
What’s the best type of rice for Mexican rice in this recipe?
Long-grain white rice is essential for authentic texture it stays fluffy and separate rather than sticky. Avoid medium or short-grain rice, which becomes mushy. Jasmine or standard long-grain white rice both work perfectly. Don’t use instant rice, as it won’t absorb the flavors properly and results in mushy texture.
Can I use canned refried beans instead of making them from scratch?
Yes, canned refried beans work in a pinch. However, homemade beans with bacon grease offer superior flavor and texture. If using canned, choose traditional-style (not fat-free) and doctor them up by heating with a tablespoon of bacon grease or butter, plus cumin and garlic powder to replicate the homemade taste.
What if I can’t find poblano peppers?
Pasilla peppers (often mislabeled as poblanos) work identically. Anaheim peppers offer similar mild heat with slightly different flavor. For more kick, use hatch green chiles. Bell peppers lack the characteristic heat but can substitute if roasted for smoky flavor. In emergencies, canned diced green chiles work, though you’ll miss the roasted complexity.
How do I prevent my burrito from getting soggy?
The bean layer acts as a moisture barrier between the wet filling and the tortilla. Ensure your rice isn’t overly wet drain any excess liquid before assembling. Don’t add salsa or sour cream inside the burrito; serve these on the side. Grilling the assembled burrito immediately also seals the tortilla and prevents moisture absorption.
Why do my burritos fall apart when I roll them?
Common mistakes include overfilling (use only ¾ cup total filling), not warming the tortilla sufficiently (cold tortillas crack), or failing to tuck the sides tightly before rolling. Practice the fold technique: sides in first, then roll tightly from the bottom, keeping constant pressure. The bean “glue” layer also helps hold everything together.
Can I make this recipe vegetarian or vegan?
This recipe is already vegetarian! For vegan adaptation, replace butter with olive oil in the rice, skip the bacon and use 2 tablespoons of olive oil for the beans, use vegetable broth instead of chicken broth, and substitute vegan cheese or omit it entirely. Nutritional yeast adds cheesy flavor to vegan versions.
What kind of cheese melts best in bean and cheese burritos?
Monterey Jack melts beautifully and has mild flavor that doesn’t overpower other ingredients. Sharp cheddar adds tang but can be greasy. A Mexican cheese blend (cheddar, Monterey Jack, queso quesadilla, and asadero) offers the best flavor and melt. Pre-shredded cheese contains anti-caking agents that prevent optimal melting, so shred from a block when possible.
How spicy is this burrito with poblano peppers?
Poblano peppers are mild with a Scoville rating of 1,000-2,000 units about the same as a pepperoncini. Roasting further mellows the heat. Most people find them pleasantly flavorful without significant spice. If you’re heat-sensitive, remove all seeds and membranes. For more heat, leave some seeds or add jalapeños.
Can I freeze assembled burritos?
Yes! Assemble burritos completely but don’t grill them. Wrap each tightly in plastic wrap, then aluminum foil, removing as much air as possible. Freeze for up to 2 months. Thaw overnight in the refrigerator, unwrap, then grill as directed. You can also cook from frozen in a 375°F oven for 35-40 minutes, flipping halfway.
Why add tortilla chips inside the burrito?
The tortilla chips provide textural contrast and a delightful crunch that distinguishes this copycat recipe from ordinary bean burritos. As the burrito sits, the chips soften slightly but retain some crispness, creating an interesting bite. This is an authentic Chuy’s technique that adds a playful element to every mouthful.
What’s the difference between this and a regular bean burrito?
This recipe for Chuy’s bean and cheese burrito features homemade Mexican rice (not just beans), bacon-infused refried beans (not canned), fire-roasted poblano peppers for smoky depth, embedded tortilla chips for crunch, and a final grilling step that crisps the exterior. These layers and techniques create restaurant-quality results far superior to basic bean burritos.
How do I get the tortilla crispy without drying out the filling?
Use medium-high heat and work quickly 2-3 minutes per side is sufficient. The key is ensuring your filling is already hot before assembling; cold filling requires longer cooking time, which dries out the tortilla. A light oil spray on the griddle helps achieve golden color faster. Press gently with a spatula for even contact.
Can I use brown rice instead of white rice?
Brown rice requires different liquid ratios (2¼ cups liquid per 1 cup rice) and longer cooking time (45 minutes). While nutritionally superior, it won’t replicate authentic Mexican rice texture or flavor. If using brown rice, consider using instant brown rice, which cooks in 10 minutes and better approximates the texture.
What sides pair best with these burritos?
Classic pairings include Mexican street corn (elote), cilantro-lime rice (if not already in the burrito), black beans, tortilla chips with queso or guacamole, Mexican street tacos, or a simple cabbage slaw with lime dressing. For lighter options, serve with a crisp romaine salad topped with cotija cheese and chipotle-lime vinaigrette.
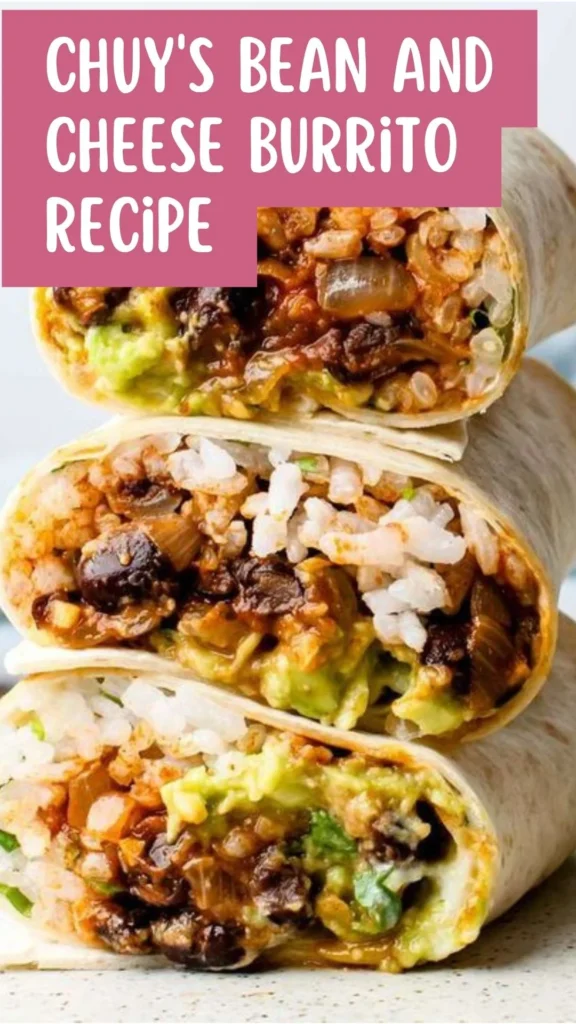
Chuy's Bean and Cheese Burrito Recipe

If you’ve ever craved that iconic Chuy’s bean and cheese burrito with its perfectly seasoned rice, creamy refried beans, and smoky roasted poblano peppers, you’re in for a treat. This copycat Chuy’s bean and cheese burrito recipe brings the beloved Tex-Mex restaurant experience straight to your kitchen.
Ingredients
- 1 medium onion, finely diced
- 1 tablespoon neutral oil (vegetable or canola)
- 1 tablespoon butter
- 1 cup long-grain white rice
- 1 teaspoon dried oregano
- 1 teaspoon ground cumin
- ½ teaspoon onion powder
- ½ teaspoon garlic powder
- 1 teaspoon chili powder
- 1¾ cups chicken broth (preferred) or water
- ⅔ cup tomato sauce
- 2 large poblano peppers (or pasilla peppers)
- 1 teaspoon oil for rubbing
- 1 (15-ounce) can pinto beans with liquid
- 3-4 strips bacon
- ½ teaspoon garlic powder
- ½ teaspoon ground cumin
- Salt and black pepper to taste
- 1 large flour tortilla (burrito-size, 10-12 inches)
- ½ cup refried beans (divided)
- ½ cup Mexican rice
- 2-3 strips roasted poblano pepper
- ½ cup shredded cheese (cheddar, Monterey Jack, or Mexican blend)
- 4-5 tortilla chips
Instructions
Step 1: Prepare the Mexican Rice
Finely dice the onion using horizontal cuts, vertical cuts, then chopping across. Heat the oil and butter in a medium saucepan over medium heat. Add the diced onion and sauté for about 5 minutes until softened and translucent. Stir in the rice, coating each grain with the fat, and toast lightly for 1-2 minutes until fragrant.
Step 2: Season and Cook the Rice
Add oregano, cumin, onion powder, garlic powder, and chili powder to the rice mixture, stirring to distribute evenly. Pour in the chicken broth and tomato sauce, stirring well to combine. Bring the mixture to a rolling boil, then immediately cover with a tight-fitting lid. Reduce heat to low and simmer for 15 minutes without lifting the lid.
Step 3: Finish the Rice
After 15 minutes, remove from heat and let stand covered for 5 minutes. Fluff the rice with a fork and check the bottom of the pan to ensure nothing is sticking or burning. Set aside while you prepare the other components.
Step 4: Roast the Poblano Peppers
Rub the poblano peppers lightly with oil to coat the skin. Place them directly on a hot grill, under a broiler set to high, or over a gas stovetop flame. Char the peppers, turning occasionally with tongs, until the skin is blackened and blistered evenly on all sides and the peppers appear puffy this takes about 8-10 minutes.
Step 5: Steam and Peel the Peppers
Immediately transfer the charred peppers to a paper bag or sealed container. Close tightly and let them steam for 10 minutes this loosens the skin. Remove the peppers and peel off the charred skin under cool running water (some black bits remaining are fine and add flavor). Remove the stems and seeds, then slice the peppers into ¼-inch strips. Set aside.
Step 6: Make the Refried Beans
Cook the bacon strips in a large skillet over medium heat until crispy and the fat is rendered, about 6-8 minutes. Remove the bacon pieces (save for snacking or discard). Drain the pinto beans, reserving the liquid in a separate container. Add the drained beans to the bacon grease in the pan.
Step 7: Season and Mash the Beans
Heat the beans through for 2-3 minutes, then season with garlic powder, cumin, salt, and black pepper. Using a potato masher, mash the beans to your desired consistency leave some chunks for authentic texture rather than making them completely smooth. Add reserved bean liquid, a tablespoon at a time, if the beans become too thick or dry. Keep warm over low heat.
Step 8: Warm and Prepare the Tortilla
Heat a griddle or flat-top pan over medium-high heat. Place the flour tortilla on the hot surface for about 10 seconds per side, just until warm and pliable but not crispy. Remove to a clean work surface.
Step 9: Layer the Burrito Filling
Spread about ¼ cup of refried beans in a horizontal line across the center of the tortilla, leaving 2 inches from the edges this acts as “glue” to hold everything together. Arrange 2-3 strips of roasted poblano pepper over the beans. Add ½ cup of Mexican rice on top of the peppers. Sprinkle the shredded cheese evenly over the rice. Add another thin layer of refried beans (about 2-3 tablespoons) over the cheese. Place 4-5 tortilla chips in a line down the center for that signature crunch.
Step 10: Roll the Burrito
Fold the left and right sides of the tortilla inward over the filling. Starting from the edge closest to you, tightly roll the burrito away from yourself, keeping the sides tucked in and the filling compact. Roll until completely sealed.
Step 11: Grill to Perfection
Place the rolled burrito seam-side down on the hot griddle. Cook for 2-3 minutes until the bottom is golden brown and crispy. Carefully flip and cook the other side for another 2-3 minutes. Rotate to crisp the edges as well. The tortilla should be toasted and golden with visible grill marks.
Step 12: Serve
Remove the grilled cheese burrito from the heat. Optionally, cut it in half diagonally to showcase the beautiful layers inside. Serve immediately while hot to enjoy the contrast of crispy exterior, melted cheese, fluffy rice, and creamy beans.
Notes
Store assembled but ungrilled burritos wrapped individually in aluminum foil in the refrigerator for up to 3 days, or freeze for up to 2 months. Reheat refrigerated burritos on a griddle over medium heat for 3-4 minutes per side until heated through. For frozen burritos, thaw overnight in the refrigerator before reheating, or microwave for 2-3 minutes, then crisp on a hot griddle.
Nutrition Information:
Yield:
6Serving Size:
1Amount Per Serving: Calories: 120
This copycat Chuy’s bean and cheese burrito recipe delivers authentic Tex-Mex flavors with homemade components that truly make a difference. The combination of fluffy, seasoned Mexican rice, bacon-kissed refried beans, smoky roasted poblano peppers, and that unexpected tortilla chip crunch creates a restaurant-worthy experience at home.
Whether you’re following these Chuy’s bean and cheese burrito recipe instructions exactly or customizing with your favorite additions, you’ll achieve that perfect balance of textures and flavors. This delicious Chuy’s bean and cheese burrito proves that with quality ingredients and proper technique, you can recreate beloved restaurant dishes in your own kitchen and maybe even improve upon them!
You can also follow us on Pinterest, and YouTube for more delicious updates and kitchen inspiration. Your feedback and support mean the world to us!