
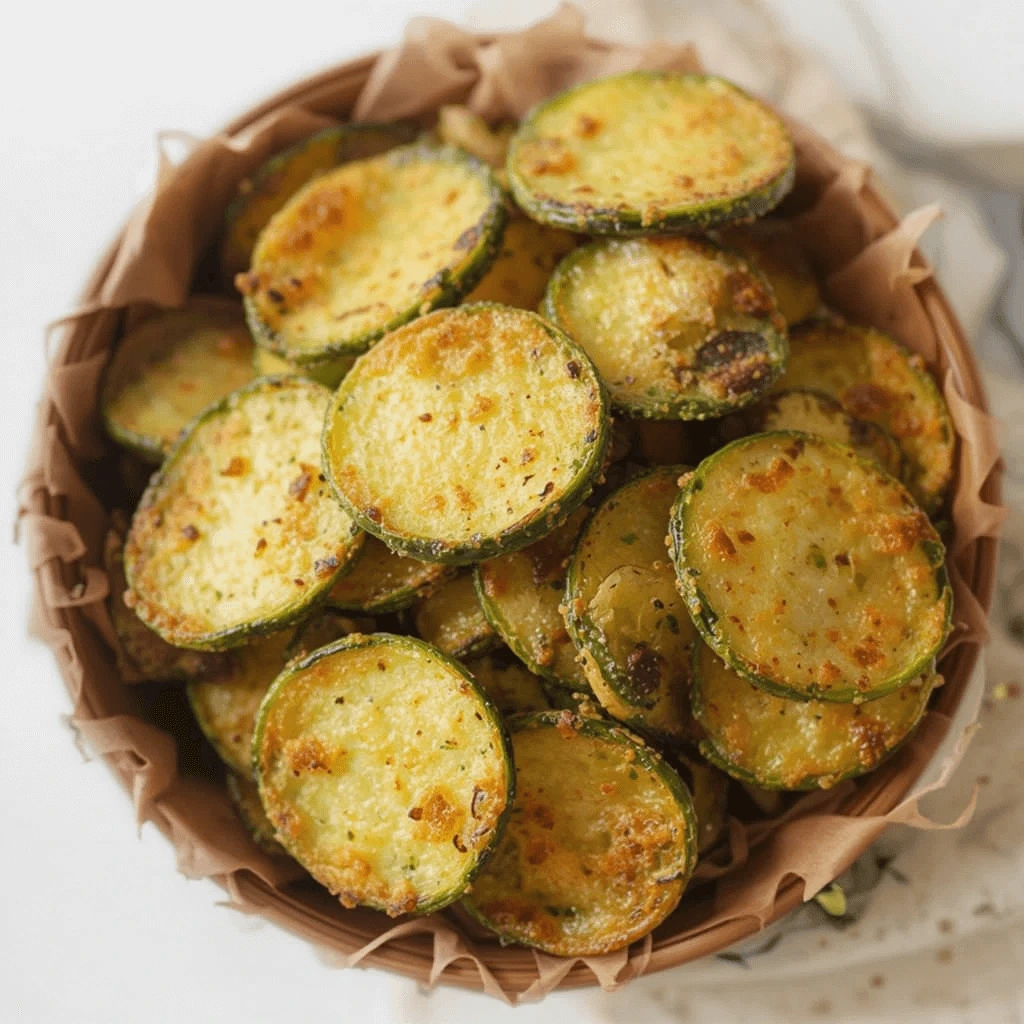
Craving a crispy and healthy snack? These homemade zucchini chips are the perfect guilt-free alternative to traditional potato chips. Light, crunchy, and packed with flavor, they’re easy to make using simple ingredients like fresh zucchini, olive oil, and seasonings. Whether you bake them in the oven or cook them in an air fryer, you’ll get a deliciously crispy texture without deep frying. Plus, they’re low-carb, gluten-free, and perfect for any diet. Follow this easy recipe to enjoy a nutritious snack that’s both satisfying and easy to prepare!
Why You’ll Love These Crispy Zucchini Chips
A Healthy and Guilt-Free Snack
- Low-Carb: Zucchini chips are naturally low in carbohydrates, making them a perfect snack for those following low-carb or keto diets. Unlike traditional potato chips, they won’t spike your blood sugar, helping you maintain energy without the crash.
- Gluten-Free: These chips are naturally gluten-free, ideal for anyone with gluten sensitivities or those who prefer to avoid gluten in their diet. Zucchini is a wholesome and safe option for gluten-free eating.
- Low-Calorie: Zucchini chips are much lighter on the calories compared to regular chips, allowing you to indulge without guilt. They are a great alternative when you’re craving something crunchy but want to avoid the empty calories in processed snacks.
- Customizable Flavor: With simple ingredients like garlic powder, paprika, and Parmesan cheese, you can adjust the seasoning to suit your taste. From spicy to cheesy or classic salted, zucchini chips can be made to fit any flavor profile.
- Free from Unhealthy Additives: These homemade chips are free from artificial preservatives, unhealthy oils, and excess salt, ensuring that every bite is a healthy choice.
- Crispy and Satisfying: Achieve the perfect crunchy texture by baking or air frying, making these zucchini chips a satisfying snack that won’t leave you feeling weighed down.
Perfectly Crispy Every Time
To get crispy zucchini chips without deep frying, follow these simple tips for the perfect crunch:
- Slice Thinly and Evenly: For even crispiness, slice your zucchini into 1/8-inch rounds. A mandoline slicer helps achieve consistent thickness.
- Remove Moisture: Zucchini contains a lot of water, which can make chips soggy. After slicing, sprinkle with salt and let the zucchini sit for 10-15 minutes. Use a paper towel to gently blot the slices and absorb any excess moisture.
- Use Olive Oil Sparingly: Lightly coat the zucchini with olive oil to help achieve a crispy texture. You can use a spray bottle or brush to apply a thin layer.
- Bake or Air Fry: Bake at 400°F/200°C for even crispiness, or use an air fryer for a faster, equally crunchy result. Both methods reduce the need for excess oil.
- Flip Halfway: Flip the zucchini chips halfway through baking or air frying to ensure even crisping on both sides.
By following these tips, you can enjoy crispy zucchini chips without the added fat and calories of deep frying.
Easy to Make – Simple Ingredients and Quick Preparation for a Hassle-Free Snack
Zucchini chips are incredibly easy to make with just a few basic ingredients: fresh zucchini, olive oil, and your choice of seasonings like garlic powder, paprika, or Parmesan cheese. There’s no need for complex ingredients or long shopping lists.
The preparation is quick—simply slice the zucchini, season, and bake or air fry. No marinating or complicated steps, just a few minutes of prep.
Despite the simple process, zucchini chips are full of flavor. You can customize the seasoning to your liking, whether you prefer them cheesy, spicy, or savory.
In under an hour, you’ll have a batch of crispy, healthy zucchini chips, perfect for busy days or quick snacks.
Essential Ingredients for the Best Zucchini Chips
Choosing the Right Zucchini – Fresh, Firm, and the Ideal Size for Slicing
The key to making perfect zucchini chips begins with choosing the right zucchini. The quality of the zucchini you select can significantly impact the final texture and flavor of your chips. Here’s how to choose the best zucchini for your recipe:
- Fresh and Firm: Always choose fresh zucchini that feels firm to the touch. Avoid zucchini with soft spots, wrinkles, or signs of wilting. Fresh zucchini provides a crispy texture, ensuring your chips come out crispy and flavorful.
- Ideal Size for Slicing: The ideal zucchini for chips is 6-8 inches long. Smaller zucchinis tend to be more tender but might not hold up as well, while larger zucchinis may have tough seeds and watery flesh. Medium-sized zucchinis provide a great balance for uniform slicing and even cooking.
- Skin Color: Choose zucchinis with dark green skin, indicating they are ripe and perfect for cooking. Light or yellow zucchinis may be overripe and not crisp up well, which could result in a soggy texture.
By selecting the right zucchini, you’ll ensure your chips turn out crispy, flavorful, and perfectly textured.
Seasoning for Maximum Flavor – Garlic Powder, Paprika, Parmesan, and More
Seasoning your zucchini chips is where you can really enhance their flavor and make them uniquely yours. While garlic powder, paprika, and Parmesan are classic choices, there are many other seasonings and combinations to try that will elevate your chips. Here’s how you can bring out the best in your zucchini chips with the right seasonings:
- Garlic Powder: A must-have for a savory, rich taste, garlic powder adds depth to zucchini chips. It pairs perfectly with the mild flavor of the zucchini, infusing each bite with a subtle, aromatic richness.
- Paprika: Paprika adds a touch of warmth and smokiness to your zucchini chips. Whether you use smoked paprika for a deeper flavor or sweet paprika for a milder kick, this spice enhances the crispiness and color, giving the chips a golden, appealing look.
- Parmesan Cheese: Adding grated Parmesan cheese creates a cheesy, umami flavor that complements the zucchini’s natural taste. Parmesan not only adds flavor but also contributes to a crisp, slightly crunchy texture as it bakes, giving your chips an extra layer of richness.
- Herbs and Spices: Consider adding a sprinkle of dried oregano, basil, or thyme for a Mediterranean flair. Fresh rosemary can also add an aromatic twist. You can experiment with other spices like cayenne pepper for a bit of heat or lemon zest for a fresh, citrusy zing.
- Custom Blends: If you prefer a more unique flavor, create your own seasoning mix by combining onion powder, black pepper, salt, and cayenne pepper. A dash of nutritional yeast can also provide a cheesy, vegan-friendly option.
The possibilities are endless when it comes to seasoning zucchini chips. With these flavors, you can easily customize your chips to suit your taste, from mild and savory to spicy and bold. Experiment with different combinations to find the perfect mix that enhances the natural flavor of the zucchini while making the chips even more irresistible.
Baking vs. Air Frying – The Best Methods for Crispy, Golden-Brown Chips
When making zucchini chips, both baking and air frying are excellent methods for achieving a crispy, golden-brown texture without deep frying. Here’s a quick comparison:
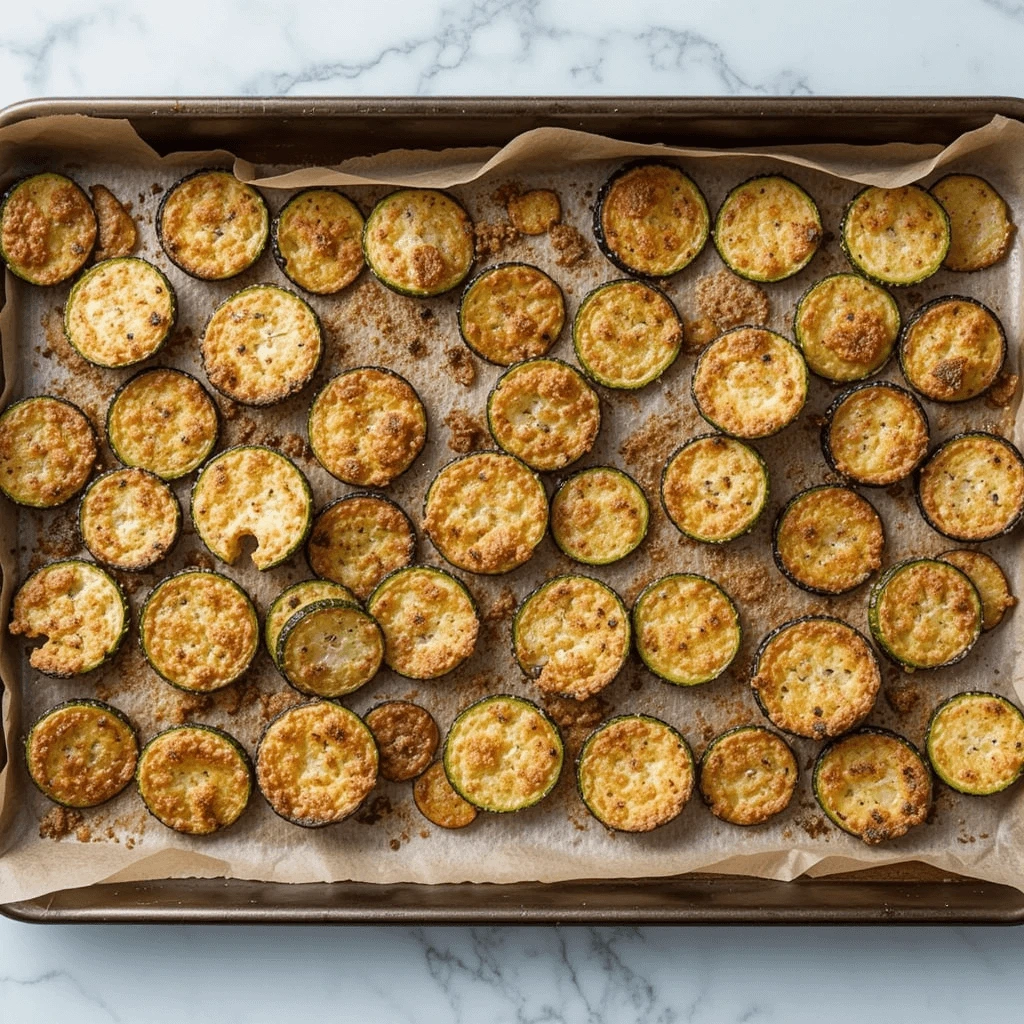
- Baking: Baking zucchini chips in the oven gives you an even, slow cook. Set your oven to 400°F (200°C) and bake for about 25-30 minutes, flipping the chips halfway through. This method allows you to use less oil, resulting in crispy chips with a satisfying crunch. It’s great for larger batches but takes a bit longer than air frying.
- Air Frying: The air fryer cooks zucchini chips in 10-15 minutes by circulating hot air, creating a crispy texture with minimal oil. It’s faster than baking and perfect for smaller batches. The hot air crisps the chips quickly, making them light and crunchy without flipping them during cooking.
Both methods result in delicious chips, so your choice depends on the time available and whether you’re making a large or small batch. Baking is best for bigger portions, while air frying is ideal for speed and convenience.
Step-by-Step Guide to Making Crispy Zucchini Chips
Step 1: Preparing the Zucchini
To get crispy zucchini chips, proper preparation is essential. Here’s how to do it right:
- Slicing the Zucchini: Start by washing the zucchini and slicing it into 1/8-inch thick rounds. Even slices ensure uniform cooking, so use a sharp knife or mandoline slicer for consistency.
- Salting to Draw Out Moisture: Zucchini has a high water content, which can lead to soggy chips. Sprinkle salt evenly over the slices and let them sit for 10-15 minutes. This step helps draw out excess moisture, making your chips crispier when cooked.
- Patting Dry: After salting, gently pat each zucchini slice dry with a paper towel or clean cloth to remove the moisture.
By following these steps—even slicing, salting to remove moisture, and patting dry—you’ll set your zucchini chips up for the perfect crisp and flavor.
Step 2: Coating for Extra Crunch
Coating your zucchini slices properly is essential for that crispy, golden finish. Here’s how to achieve the perfect crunch:
- Olive Oil: A light coating of olive oil helps crisp up the zucchini slices and ensures even cooking. Use a drizzle or a spray bottle to apply a thin layer. The oil also helps the breadcrumbs and seasonings stick to the zucchini.
- Breadcrumbs: For added crunch, dip the zucchini slices in breadcrumbs. Panko breadcrumbs work best for a crispier texture, while regular breadcrumbs give a finer crunch. Mix in Parmesan cheese or herbs like oregano and thyme to boost flavor.
- Seasonings: Season the zucchini slices for extra flavor. Garlic powder, paprika, and black pepper are great options, while Parmesan cheese adds a savory kick. You can also experiment with onion powder, cayenne pepper, or Italian seasoning for a unique taste. Make sure each slice is evenly coated to ensure a consistent, flavorful crunch.
By coating the zucchini with olive oil, breadcrumbs, and seasonings, you’ll achieve the perfect crispy texture and a burst of flavor in every bite.
Step 3: Cooking to Perfection
Achieving the perfect crispy texture depends on your cooking method—baking or air frying.
- Baking: Preheat your oven to 400°F (200°C) and arrange the zucchini slices in a single layer on a lined baking sheet. Bake for 25-30 minutes, flipping halfway through for even crisping. Monitor them closely to avoid overcooking. Baking offers a consistent cook for evenly crispy chips.
- Air Frying: Preheat your air fryer to 375°F (190°C) and cook the zucchini slices in a single layer for 10-15 minutes. Air frying uses circulating hot air for a quicker, crispier result with minimal oil.
Both methods give you crispy, golden chips—baking for a slower cook and air frying for speed and convenience.
Serving Suggestions and Dipping Sauces
Best Dips for Zucchini Chips
Pairing your zucchini chips with a great dip can enhance their flavor. Here are some delicious options:
- Ranch Dressing: A creamy, tangy dip that complements the mild flavor of zucchini chips. For a healthier twist, use Greek yogurt instead of sour cream for added protein.
- Garlic Aioli: Made with garlic, olive oil, and lemon juice, this rich dip adds a savory, tangy flavor that pairs perfectly with the crispy texture of the chips.
- Spicy Yogurt Dip: Combine Greek yogurt with hot sauce, lime juice, and a pinch of cayenne pepper for a creamy, spicy kick that balances the chips’ crispiness.
These dips offer a variety of flavors—from creamy and tangy to spicy—making them perfect for any zucchini chip lover.
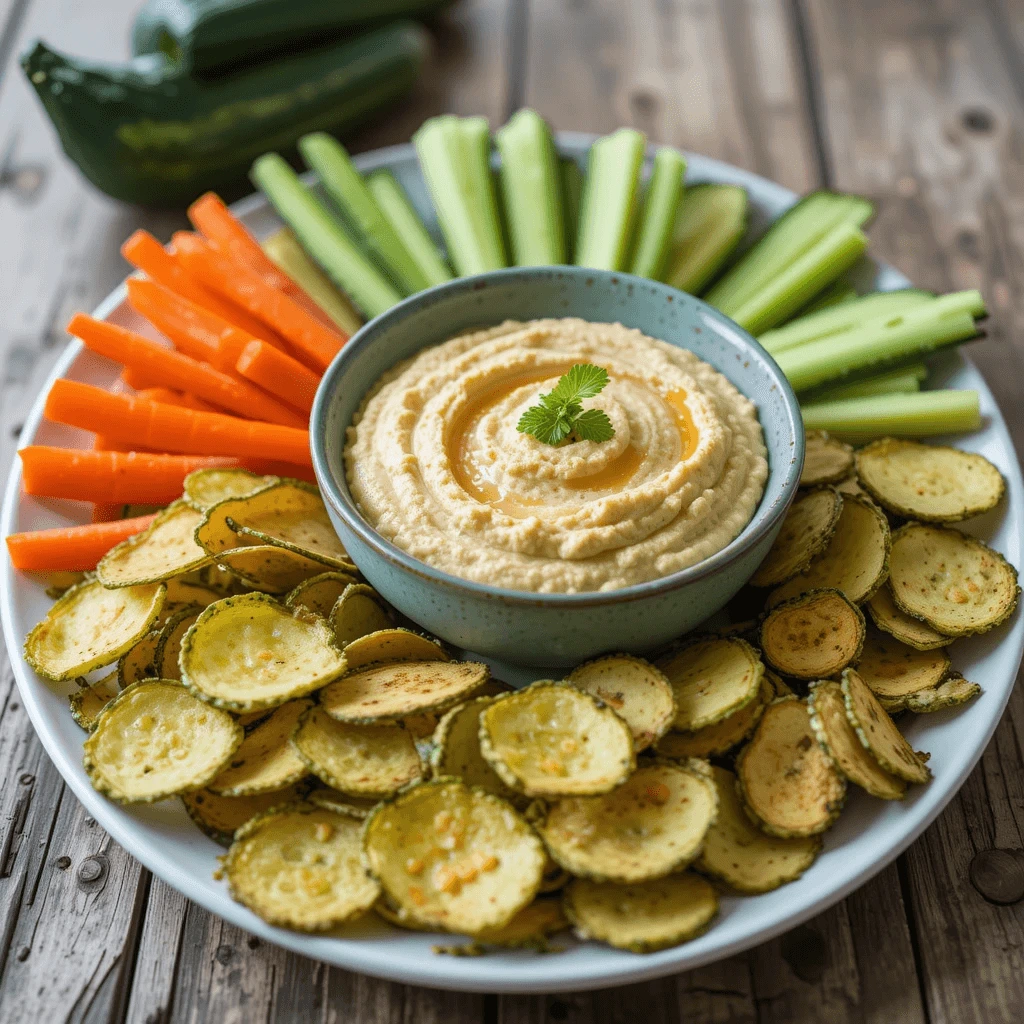
Pairing with Other Healthy Snacks
Zucchini chips make a fantastic standalone snack, but they’re also perfect when paired with other healthy options. Combining them with nutritious sides creates a well-rounded, satisfying snack or meal. Here are a few pairing ideas:
- Hummus: Creamy, rich, and packed with protein, hummus is an ideal dip for your zucchini chips. Whether you prefer classic chickpea hummus or something more adventurous, like roasted red pepper or avocado hummus, the creamy texture complements the crunch of the chips. Plus, hummus adds fiber and healthy fats to your snack.
- Fresh Veggies: Enhance your snack with fresh vegetables like carrot sticks, celery, or cucumber slices. These veggies are low in calories, rich in vitamins, and provide a refreshing contrast to the crispy zucchini chips. Together, they make for a colorful and nutrient-packed snack platter.
- Light Salad: A light salad of mixed greens, tomatoes, cucumbers, and a light vinaigrette adds a fresh and crunchy element to your zucchini chips. The crisp vegetables and tangy dressing complement the flavors of the chips, creating a balanced snack or meal option.
Storing and Reheating Tips – Keeping Your Chips Crispy for Later Enjoyment
To keep your zucchini chips fresh and crispy for later, follow these simple steps:
- Storing: Once the chips have cooled, place them in an airtight container. To prevent moisture buildup, add a paper towel inside to absorb any excess moisture. Store the container at room temperature for up to 2-3 days. Avoid refrigerating, as it can make the chips soggy and lose their crunch.
- Reheating: To restore the crispy texture, preheat your oven to 350°F (175°C). Place the chips in a single layer on a baking sheet and bake for 5-10 minutes until crispy. If you prefer a quicker option, use an air fryer at 375°F (190°C) for 3-5 minutes to bring back the crunch without losing flavor.
These storage and reheating methods will help keep your zucchini chips fresh and crisp, so you can enjoy them later without compromising on taste or texture.
If you’re looking for more quick and easy homemade recipes, be sure to check out The Best French Fry Seasoning Recipe for Crispy, flavorful fries. It’s perfect for adding bold flavors to your fries, making them crispy on the outside and deliciously seasoned. A great addition to any meal or snack!